I will admit that I just could not figure out why my BumGenius Diapers were leaking last summer. I had stripped them and the fit was still okay. So I couldn’t fathom what the problem was.
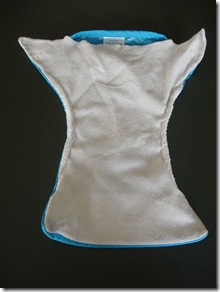
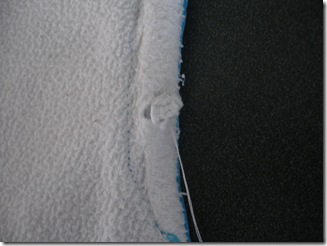
Turns out, the elastic was shot and they looked like this:
How could I not have noticed this?
(I realize this is a Fuzzi Bunz in the picture. It was the only one I currently have with shot elastic that I could use for pictures.)Regardless of my poor observation skills, I had to figure out how to fix these diapers. And cheaply. We primarily use cloth for the cost savings and I didn’t want to start spending grocery money on disposables. So I started the quest for how to repair these diapers.
I scoured the internet and found some help in a forum over at Diaper Swappers. It definitely aided me in fixing my diapers, but the pictures were lacking and I needed specifics.
So for those of you who need a tutorial in repairing cloth diapers and you don’t have the sewing skills of that talented, adorable Gussy, have no fear. This is a pretty easy fix for those of us with minimal sewing skills.
Disclaimer: This looks long and laborious. It’s really not that bad. Once I figured out how to do the first one, the next one only took about 15 minutes total.
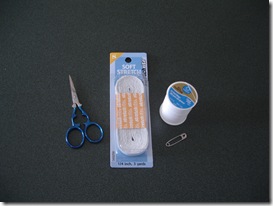
What you need:
- 1/4” cotton elastic. The elastic from JoAnne’s or Wal-Mart is fine. If you can splurge on “nice” elastic, do it as it will probably last longer.
- A pair of sharp pointy-tipped sewing scissors
- needle
- thread
- safety pin
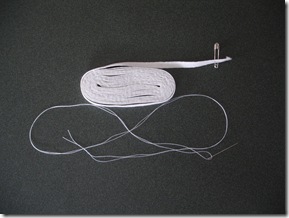
1) Your first step is to get your materials ready.
– Thread your needle with about 18-24” of thread and tie a small knot in the end.
– Secure a moderately-sized safety pin in the top of the elastic skein. There is no need to cut the elastic yet. You won’t cut until the very end.
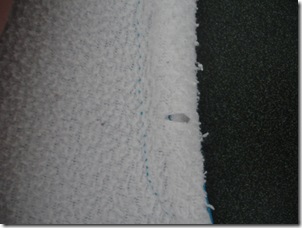
2) On one edge of the diaper, make a small cut on the edge of the fleece. You only want to cut the fleece – not the PUL. {Actually cutting a cloth diaper was really hard for me. It made me have palpitations. I was so afraid I was going to ruin it. Don’t fret over it like I did – just do it.} Make a cut about 1” above the seam at both ends of the diaper edge. You should have a cut at the top and at the bottom of the seam.
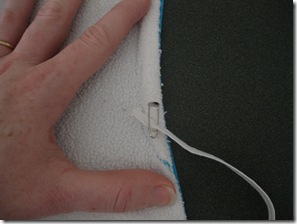
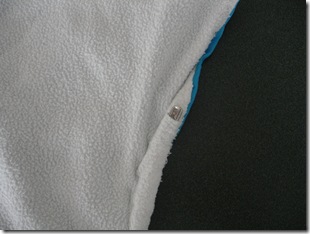
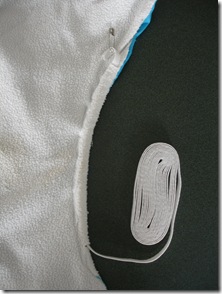
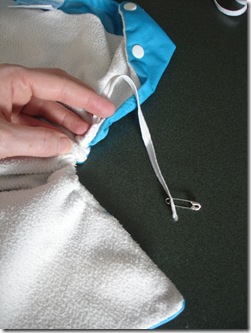
3) Insert your safety pin with the attached elastic into the hole at the bottom. Using the safety pin as a guide, thread it to the top hole you previously cut.
Starting at the bottom hole:
Safety pin peeping out of the top hole of the diaper:
And it should now look like this:
Here are where things can start to get a little tricky. But persevere – we’re getting closer to completion.
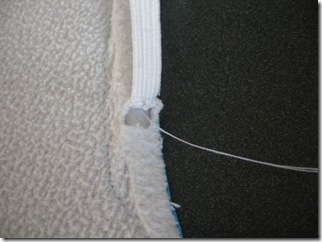
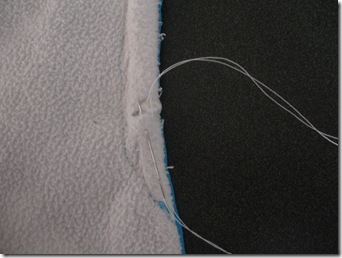
4) We’re going to sew the elastic down, starting with the bottom hole. While pulling the elastic up, start to sew from the back side of the elastic. For right now, only sew the elastic to the upper side of the hole.
5) After stitching the elastic to the upper fabric of the hole, cut off the elastic.
Now tuck the cut end of the elastic into the seam and stitch the bottom of the hole to the top.
6) Now pull the elastic taut. You need to pull it tighter than you think it should be. In my experience, it relaxes a little bit in the first wash or two and you don’t want to repeat this process again on the same diaper. So pull it fairly taut.
Stitch the elastic to the bottom edge of the hole, just like you did at the bottom of the diaper in Step #4. You must hold the elastic taut the first few stitches.
7) When you’ve sewn the elastic securely to the bottom edge of the hole, trim off the excess elastic.
Now tuck the elastic into the seam of the diaper and stitch the bottom to the top of the hole, just like you did in step #5.
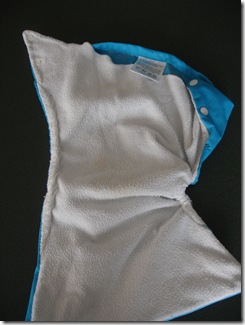
And now you’ve made one side of your cloth diaper look like it should!
So now I’ll use the same method to repair the left side of the diaper and a modified method to repair the back edge.
Cloth Diaper Repair FAQs:
– You do NOT have to remove the old elastic prior to inserting the new. It will not harm your new elastic in any way.
– If you are savvy enough, you can sew the elastic down using your sewing machine. But I am not a great sew-er so I didn’t want to attempt that.
– It doesn’t take very long. It took me about 30-40 minutes to learn on my first diaper. You can roll on through them quickly after you get the hang of the first one.
– It looks like the leg gussets are going to be too tight. They won’t be. Even on my chunky-legged girl, they are just fine.
– Don’t be disappointed when you look at your finished product: it will not look the same as it did when brand new. The gussets don’t lie down quite as well, but they will be fully functional again.
And that’s it! You’ve successfully repaired the elastic in your cloth diaper! There is nothing more frugal than re-purposing what you have so you don’t have to buy new.
Disclosure: This post contains an affiliate link.
- 1.9Kshares
- Facebook248
- Pinterest1.5K
- Print39
- Twitter41
- Email49

 How to Keep Your Bedroom Smelling Fresh
Impressive!!
Thank you
information that I wished I had when we did cloth diapers. Great tutorial on making something last longer.
.-= Selena Cate´s last blog ..The $10 Arts & Crafts Desk =-.
Selena – Such kind words. Thank you 🙂
Excellent! I have a few BG dipes that have shot elastic and couldn’t figure out how to replace it. Your step-by-step tutorial is just what I needed.
Oh I’m so glad! Let me know if you have any questions – but it’s pretty easy once you get going with it. 🙂
When I had elastic go bad in my little one’s diapers, I just gave them to my MIL and they reappeared magically as good as new. :>) But your way is awesome! I linked on my weekly roundup, post is under my name. One comment, though – it might make sense to stitch the top part first, where the pin is, then the bottom so that way you don’t have any waste, the extra is still attached to the roll.
And I guarantee that it would take me a good 25 minutes to work up the courage to make that first snip! :>) Thanks again!
.-= Lenetta @ Nettacow´s last blog ..Link Roundup – Bribe Edition =-.
Lenetta, how kind you are to link me in your link round-up! I really appreciate that! 🙂
And what a FAB MIL you have that will repair your cloth dipes!
I agree about stitching so you don’t have waste. Great idea –
-Lauren
Thank you for this! I’m looking at buying a bunch of FuzziBunz with shot elastic for $5 each! This is perfect since I do know how to sew, I can totally replace the elastic and save a ton of money!
You’re so welcome! I did the exact same thing – I bought 4 Fuzzi Bunz with shot elastic (the PUL was fine) and repaired them myself. Then I stripped them and they were as good as new!
Let me know if you have any problems. I’ll be happy to help you troubleshoot.
-Lauren
Thanks so much for this..I am not a sewer, but have about 8 BG AIO that need new elastic! I am going to attempt to do this..wish me luck mama!!
Please let me know if you run into trouble! But really, this method is so easy you should be fine.
Thanks for stopping by 🙂
-Lauren
Hahahaha this worked!! I even got directions for the backs.. and it worked too.. 🙂 The fleece doens’t sit in like it used to but it works perfect. Better then not using the diaper.
Yay! So glad it worked well for you!
Hmmm… wonder why your fleece doesn’t ‘sit’ the same? As long as it works well, right?!
Thanks for letting me know your results! 🙂
The fleece probably doesn’t “sit” the same because there is now more bulk in the leg gussets than there was before. I’ve replaced elastic in LOTS of FB the “correct” or “harder” way by stitch ripping the casing out and then replacing the elastic. Then I re-stitch the casing. It’s not too hard and looks just like new. It IS harder than your method, though. Getting the old stitches out is the hard part. You want to remove them without hurting the PUL. Then, when you’re done, you’ll want to run them in a HOT dryer for a cycle to “heal” the PUL around the stitching.
For your method, the type of thread isn’t that important. However, if you’re stitching through the PUL, make sure you use 100% polly thread ONLY. If there’s any cotton in it, it will wick.
Kara – Wow! Such good advice! Thanks so much for adding your expertise.
That’s good to know about using 100% poly thread ONLY. I only have to stitch the PUL when I replace the elastic in the back of the diaper (around the rear end). And yes, I definitely use poly. Wicking anywhere is no good!
Again, great thoughts. Thank you for sharing. 🙂
-Lauren
I know that this is an old post, but I’m hoping for an answer to my question, so here’s hoping for a reply! I just replaced elastics on 36 bumgenius freetime diapers. I opened up the top of each diaper, turned inside out, and pulled the new elastic through each casing by attaching it to the old elastic with a safety pin. Worked great! Didn’t realize until I was done that I used 100% cotton thread instead of poly 🙁 Since I didn’t open up any casings and only sewed through the lining after turning the diaper inside out, will this mistake likely be ok, or will I need to go back and replace all of them with poly??
Liz, you should reward yourself with something FABULOUS after replacing all of that elastic!!! What a feat!
I think you’ll probably be fine with the cotton thread instead of the poly for awhile, but my guess is that the cotton won’t last you quite as long. You might have to replace sooner than if you’d used the poly.
I’d be extra careful about washing/drying with heat, as that is the enemy of that cotton thread.
Best wishes!
Lauren 🙂
So grateful for the info. My whole stash has bad elastic and I just had a new baby. Now I don’t need to buy new diapers. Thanks.
Wynn, I’m so glad this will work for you! And once you get the hang of it, one diaper will take you about 10 minutes or so. So it’s not horribly time-consuming.
Congratulations on your new baby! 🙂
-Lauren
Thanks for this! I don’t have a sewing machine but I have two BG 3.0’s with shot elastic and its been driving me crazy to not be able to repair them. Everywhere I see says that you have to have a sewing machine in order to repair them. I can hand stitch relatively well so I’m very excited to to try this out and get my 2 diapers in working order.
Thanks again!
Oh you’re welcome! If you hand stitch well, then this will be a cinch for you!
Let me know if you have questions! 🙂
-Lauren
Well, I finally got elastic and polyester thread and I got a couple done today! They look great and after figuring out how to thread the elastic through with the safety pin it was SO easy! Yay two “new” diapers!
Thanks so much again. 🙂
Shelley, I’m so glad it worked for you! After you do the first one, they go pretty fast.
Thanks for letting me know it was a success!
-Lauren
Thank you thank you for this! I just got 12 fuzzi bunz with shot elastic from a friend… Can’t you tell me where you found directions for the back part on the pocket? It is PUL and I don’t want to cut it if I don’t have to…
Lena, your dipes will be good as new in no time 😉
Do you need to repair the elastic part that goes around the back of the waist? I don’t think you have to cut the PUL….? I’ll go take a look at one and get back to you.
-Lauren
GREAT tutorial… thank you for sharing :). My question is, how long is the elastic that actually goes into the diaper legs??
I’m glad it was helpful!
I didn’t measure, since I just pull it from the whole skein of elastic and cut at the end. My guess is 4-5 inches, depending upon the size of the diaper.
If you have a lot to repair and you’re trying to estimate how much elastic you’ll need, I would assume 5 inches per diaper. But you probably won’t need quite that much.
-Lauren
Thanks so much for this! Our Smartipants were in desperate need of repair. I was having to use two inserts just to keep from leaking. I’m much slower at this than you are – my first one took me nearly 2 hours! – but the finished product looks great. Here’s hoping this second round of elastic will hold.
Oh I’m so glad it worked well for you, Sally! Don’t worry – the more you fix, the faster you’ll get!
Let me know if you need help –
-Lauren
THANKS!! I’ve been wanting a tut that didn’t involve sewing machines or too many steps for my have-an-infant sleep-fogged brain. This is perfect! Now I can bring my pockets back from the dead.
Oh Yay! So glad it could help you, Faith.
I’m right there with you on the sleep-deprived brain. 😉
-Lauren
Did the regular elastic hold up well in subsequent washings? I need to repair some diapers and I’m not sure if I can use standard elastic or if I need to purchase some clear plastic Lastin.
Gina, I’ve done many with regular elastic (from Walmart) and a few with Lastin. If you can find the Lastin, then definitely use it. It has held up better.
I was pleased with my results with the plain elastic, but I was *thrilled* with my results with the Lastin. 😉
-Lauren
Thanks so much for the answer! I will look for the Lastin. =)
Thanks so much for your tutorial! I’ve been scouring the web all day for a “how-to”!
Would you recommend the same process/size of elastic for the inner gussets of Rumparooz dipes?
Mandi, I don’t personally own any Rumparooz diapers but by looking at the gussets online, I feel like it would be the same process to place new elastic. By the looks of the online images, the casing for the elastic is the same.
I’m sorry I can’t give more personal advice! I hope the tutorial helped save your dipes! 🙂
-Lauren
Thanks so much for this!!! I need to replace the back elastic as well. Do I have to cut the PUL?
You do! Scary, I know!
I’ve actually replaced almost all of the back elastic in mine by cutting the PUL and I”ve had zero trouble. And that’s been many months ago (and many washes later!)
I know there are some mamas though that will NOT cut the PUL. In my experience, it has worked out well.
Thank you thank you thank you!!
Just figured out that our diapers are leaking because of shot elastic, and was not pleased thinking that I’d have to replace them….
This is just what I needed!!!
Glad you found it! 😉 Let me know if you need help –
-Lauren
Thank you so much! I cried when I discovered my elastic was ruined because I had poured so much money into my all-in-one diapers. This is a great tutorial. My only other request would be a picture of what it looks like when you sew the holes closed, since I’m not sure if I am doing it right, though maybe that is a basic sewing skill I should know. Anyway, thanks again!
Nevermind, I guess there is a picture, I just didn’t examine it closely enough. 🙂
How do I replace the elastic in the back? I can’t find any instructions for that. Thanks!
Jessica, I get this email frequently, so I need to post a tutorial on that! I’ll work on it. 😉
Was there ever a tutorial posted for replacing the top/back elastic? I just did the legs on my first and it worked wonderfully! Thanks for the great post! Trying to figure out how to do the rest now. Should I just follow the same steps? New to cloth diapering and trying to get this little preloved stash prepped ready before baby comes! 🙂
I feel a little silly asking this sice I’ve been sewing for well over 10 yrs. What does wicking mean? Is it a term used just for when it comes to making cloth diapers?
Never mind I found my answer. Turns out I knew what it meant and just never heard the term before! thanks!
Thank you,thank you, thank you for this tutorial!!!! While I know how to sew and have a machine, I have 18 dipes in desperate need of elastic repair but not alot of time on my hands! Your method is sooooo much easier and quicker than everything else I’ve seen! I’m excited to get started on my dipes tonight! Thank you again!
Oh my goodness, thank you so much! Here I thought I was going to have to give up CDing because the elastic is shot on my Alvababy’s. you have saved me TONS of money! 🙂
Thank you for this tutorial. great help
Thank you so much!! I hope when I get my loose diapers my friend is sending, it will be easy to fix them!!
I’m soooooo happy I found this! Just bought 4 rumparoos diapers on ebay for $7 they just need new elastic on the back pocket hole! Score for me! Im so happy that replacing elastic is this easy and to know that I dont have to take the old elastic out lol I was about to waste alot of time!
Thank you for this post! I bought two sustainablebabyish diapers for $2 each off a facebook page but the elastic was shot. Those diapers are expensive so I couldn’t pass it up. So for a for $1 I was able to repair both! Thanks!!!
Thank you so much for putting this up. I have a super cute diaper that needs some help and this made the repair so much easier for me and I saved money by not having not send it in the get fixed.
Thank you very much! Definately an easy tutorial to follow.
I’m glad it worked for you!!
xo, Lauren
Thanks so much! My whole batch of beloved DiaperRite AIOs went at once, leaving us with nothing but prefolds or leaky diapers to use. I had actually ripped apart the seam of one after cutting the lining to turn it inside out, in desperation, but I tried your way on the other side and it is sooo much quicker that I will be using that method to repair all of them! We just got slammed, budgetarily speaking, so buying new diapers was out of the question and I was at a loss for what to do. Thanks again!
Thanks for this post. I am not only going to do this on 6 bumGenius diapers very soon, but I will be sure to link to your post on my forthcoming site, ohhellomama.com within a post about cloth diapers. Thanks again!